Addressing CVE-2024-6387 Vulnerability in OpenSSH

In today’s digital world, security is paramount. Recently, a critical vulnerability, CVE-2024-6387, was found in OpenSSH. This post offers a straightforward script to help you identify and fix this issue, ensuring your system remains secure.

CVE-2024-6387 is a serious flaw in OpenSSH that can allow remote attackers to execute code on your system. Addressing this vulnerability promptly is crucial to safeguard your data.

This script checks your OpenSSH version, determines if it’s vulnerable, updates OpenSSH if needed, and applies a temporary mitigation if the update fails.

#!/bin/bash
# Checks for and remediates the CVE-2024-6387 vulnerability in OpenSSH.
# Attempt to update OpenSSH to the latest version, if the update fails, then apply a temporary mitigation
# by setting LoginGraceTime to 0 in the sshd_config file.
# Note: This temporary mitigation may expose the system to DoS attacks.
# Based on information provided by https://www.qualys.com/2024/07/01/cve-2024-6387/regresshion.txt
# Script provided by DropDeadDick.com

# Get OpenSSH version
get_ssh_version() {
    sshd -V 2>&1 | grep -oP '(?<=OpenSSH_)\d+\.\d+p\d+'
}

# Check if the system is vulnerable
is_vulnerable() {
    version=$(get_ssh_version)
    if [[ "$version" < "4.4p1" || ( "$version" > "8.4p1" && "$version" < "8.7p1" && "$version" != "8.7p1-38.el9.alma.2" ) ]]; then
        return 0 # Vulnerable
    else
        return 1 # Not vulnerable
    fi
}

# Remediate the vulnerability
remediate() {
    echo -e "\e[33mUpdating OpenSSH to the latest version...\e[0m"
    if [[ -f /etc/debian_version ]]; then
        apt-get update
        apt-get install -y openssh-server
    elif [[ -f /etc/redhat-release ]]; then
        yum update -y openssh-server
    else
        echo "Unsupported OS"
        exit 1
    fi

    echo -e "\nRestarting sshd service...\n"
    systemctl restart sshd

    is_vulnerable  # Check if still vulnerable after update
    return $?  # Return the result of the vulnerability check
}

# Apply temporary mitigation
mitigate() {
    echo -e "\e[33mApplying temporary mitigation by setting LoginGraceTime to 0...\e[0m"
    sed -i 's/^#\?LoginGraceTime.*/LoginGraceTime 0/' /etc/ssh/sshd_config
    echo -e "\nRestarting sshd service...\n"
    systemctl restart sshd
    echo -e "\e[32mTemporary mitigation applied. The system is now safe from remote code execution but may be vulnerable to DoS attacks.\e[0m"
}

# Main
if is_vulnerable; then
    echo -e "\e[31mSystem is vulnerable to CVE-2024-6387.\e[0m"
    remediate
    if is_vulnerable; then
        echo -e "\e[33mApplying temporary mitigation since the update was not successful.\e[0m"
        mitigate
        if is_vulnerable; then
            echo -e "\e[31mSystem is still vulnerable but temporarily mitigated.\e[0m"
        else
            echo -e "\e[32mSystem is no longer vulnerable but temporarily mitigated.\e[0m"
        fi
    else
        echo -e "\e[32mUpdate successful. The system is no longer vulnerable.\e[0m"
    fi
else
    echo -e "\e[32mSystem is not vulnerable to CVE-2024-6387.\e[0m"
fi

By using this script, you can protect your system from the CVE-2024-6387 vulnerability. Regular updates and proactive measures are essential for maintaining system security. Stay safe!
Taming MySQL 8’s Excessive Logging for ‘mysql_native_password’ Plugin

If you’ve recently migrated to MySQL 8 through cPanel, you might have encountered a warning message similar to the one below:

[Warning] [MY-013360] [Server] Plugin mysql_native_password reported: 'mysql_native_password' is deprecated and will be removed in the future. Please use caching_sha2_password instead.

This message indicates that the ‘mysql_native_password’ authentication plugin, which has been a part of MySQL for a long time, is no longer recommended and will eventually be removed. Instead, MySQL recommends using the ‘caching_sha2_password’ plugin for enhanced security.

The Fix: log_error_suppression_list

MySQL provides a solution that allows you to suppress specific error messages without suppressing all warnings. To address the ‘mysql_native_password’ warning without affecting the overall verbosity of your logs, follow these steps:

1. SSH Access: Access your server via SSH.
2. Edit Configuration: Open your MySQL configuration file, usually located at /etc/my.cnf.
3. Add Line: Insert the following line after [mysqld]:

log_error_suppression_list=MY-013360

This rule tells MySQL to suppress any errors with the code MY-013360, which corresponds to the ‘mysql_native_password’ warning.

4. Restart MySQL: Apply changes by restarting MySQL:

systemctl restart mysql   # For systems using systemd
service mysql restart    # For systems using init.d
/scripts/restartsrv_mysql # Reccomended for cPanel systems

cPanel AppConfig for Fantastico

A simple script to populate the configuration file and register Fantastico with the cPanel AppConfig system.

#!/bin/sh

cat > /var/cpanel/apps/addon_fantastico.conf <<EOF
name=addon_fantastico
service=whostmgr
url=/cgi/addon_fantastico.cgi
url2=/cgi/fantastico/index.php
url3=/cgi/fantastico/fantastico.php
user=root
acls=any
displayname=addon_fantastico
EOF

/usr/local/cpanel/bin/register_appconfig /var/cpanel/apps/addon_fantastico.conf

WordPress Mass Update Script

I recently came across an excellent bash to mass update WordPress installs, which was written by Liz Quilty. This script works well, but unfortunately it did require manually setting paths if you are not using /var/www for your installs. Due to the large and varying number of servers I needed this for, I decided to make some changes so the script is slightly more automated and eliminate the need for the end user to edit the script.

These changes include:
– Added –path option to allow script to be ran on a specific path only.
e.g wordpress wpupgrade.sh –path /home/user
– Added a function to check for the existence of /var/www and /home, also validates –path option to insure custom path exists.
– Added a function to check the latest WordPress version via wordpress.org api.
– Script is now broke down into into the following functions.
usercheck
path
version
main
help

Here is my modified version.

wget http://dropdeaddick.com/files/wordpress-upgradeDD.sh
bash wordpress-upgradeDD.sh

Here is the original.

wget http://b.ri.mu/files/wordpress-upgrade.sh
bash wordpress-upgrade.sh

Update Timthumb for All cPanel Users

A simple script to check all cPanel user accounts for timthumb.php(WordPress) and update them to the latest version if needed. Also checks for timthumb being used as thumb.php. Uses check to insure thumb.php is not affected for scripts like joomla, which does not use timthumb.

#! /bin/bash
# Detects and updates timthumb.php to latest version for all cPanel users.
# dropdeaddick.com

latest=`lynx -source http://timthumb.googlecode.com/svn/trunk/timthumb.php |grep "define ('VERSION'" $file |cut -f4 -d"'"`
if [ -z "$latest" ]; then
echo "could not get latest timthumb release, aborting!"
exit 1
fi
for user in `awk -F':' '{ if ($3 > 499) print $0 }' /etc/passwd | grep home | cut -d':' -f1`; do
for file in `find /home*/$user/public_html/ -type f \( -name 'thumb.php' -o -name 'timthumb.php' \) 2>/dev/null | tr ' ' '%'`; do
file=`echo $file | tr '%' ' '`
check=`grep -c "code.google.com/p/timthumb" "$file"`
if [ -z "$check" ]; then
break
fi
if [ "$check" -gt "0" ]; then
version=`grep "define ('VERSION'" "$file" |cut -f4 -d"'"`
if [ "$version" != "$latest" ]; then
echo -e "\e[1;31mWARNING version $version\e[0m updating $file!"
# rm -f $file #delete current file before replacing.
wget -nv -t3 -T3 http://timthumb.googlecode.com/svn/trunk/timthumb.php -O "$file"
chown $user: "$file"
else
echo -e "\e[1;32mOK version $version\e[0m skipping $file"
fi
fi
done
done

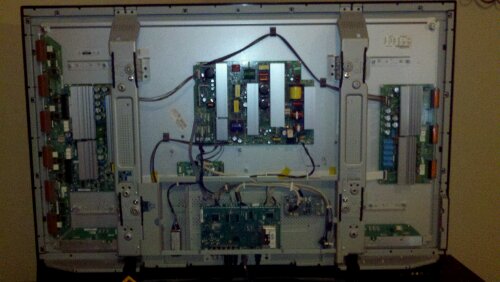
Phillips 50″ Plasma – No Power

Last night my TV decided to punish me right in the middle of watching Family Guy, by shutting itself off and refusing to come back on. After replacing the power cord, resetting the surge protector, and a lot of foul language, I finally gave up for the night. 

After working for a few hours today, I then decided to yank the back off and dig into the issue or at the least blow something up. With my trusty multimeter in hand I was able to quickly trace it down to a blown fuse. Specifically, an 8 amp 250V slow blow ceramic fuse, which I was unable to find around town and had to order from amazon.com. 

All I can do now is wait and hope that the fuse is the only issue, however, I doubt I am that lucky, after all there is no telling what caused the fuse to blow. I also came across a few articles that this model line has issues with blowing caps and I can only assume that I will have to break out the soldering iron and tackle that too.

Until then, here is nice view of what I have to look at this weekend.

image

Philips 50 plasma back panel removed

Robot Rover

I recently picked up the basic DFRobot Rover kit from robotshop.com, which finally arrived today after what seemed like an eternity on back order. I also picked up a Bluetooth kit and a couple of sensors to play with. I’m still waiting for their new wheel encoders for this kit and a couple of 6V motors, but I can get started without them. Oh well, it just gives me a reason to disassemble it all later to add the new parts.

I started out trying to gather parts to build something similar, but decided to go with their kit and save some time(something I don’t always have a lot of). Maybe later, when I feel more comfortable with arduino, then I will move onto building something from scratch.

parts

The only thing I am missing at the moment is a mini USB cable for the main board. To be truthful, I am not really missing the cable, so much as I need to untangle it from the magical ball of USB cables that I have stuffed in a drawer.


Update on February 22, 2012
I have run into a couple of small issues that well are more an annoyance than anything else. The first is that I purchased an inexpensive bluetooth dongle that was DOA. Then the dagu mini pan and tilt I purchased, is not going to fit to the rover’s mount due to the front idler axle being in its way. This was simply an oversight on my part for not giving it a once over. I will most likely create a mount for this if I use it, or look at modifying how the idler is mounted.

I also dug up some older code from cellbots for this rover, but it is outdated and will need to be updated to work with the newer IDE.

Update on February 24, 2012
I’m Still waiting on my replacement bluetooth dongle but was able to connect to the rover via terminal using the SENA BTerm app on DroidX. This worked well and allowed me to control it with WASD keys from the phone using the sample code provided by robotshop. Please note that if you want to do something silly like I did – painting the tamiya wheels – then make sure you assemble them with the end caps first. Since I didn’t add the end caps first, I had to clean up the paint around the caps that was causing the idler wheels to stick and roll as a solid axle.

Kayako API: How to Post a Ticket

A basic PHP example of how to post a new ticket via the Kayako v4 Rest API

<?php 

$apiUrl = "https://support.domain.com/api/index.php?e=/Tickets/Ticket";
$apiKey = "78db96b0-1t7c-aea4-bd51-7xf39d50cdd6";
$salt = mt_rand();
$secretKey = "ZjBiZS0N2MtMzM3MTkyNTkxMjdiZWZkMGIjE3YmJiMGUtNmY0MC0yNWU0LWY5x6DktN1NzE0LWMxMGYyZDIzOThmYjY5YT7m";
$signature = base64_encode(hash_hmac('sha256',$salt,$secretKey,true));

$subject = "Test Ticket";
$fullname = "DropDeadDick";
$email = "test@domain.com";
$contents = "Test test test test";
$departmentid = "1";
$ticketstatusid = "1";
$ticketpriorityid = "1";
$tickettypeid = "1";
$staffid = "1";

$post_data = array('subject' => $subject,
 'fullname' => $fullname,
 'email' => $email,
 'contents' => $contents,
 'departmentid' => $departmentid,
 'ticketstatusid' => $ticketstatusid,
 'ticketpriorityid' => $ticketpriorityid,
 'tickettypeid' => $tickettypeid,
 'staffid' => $staffid, 
 'apikey' => $apiKey, 
 'salt' => $salt, 
 'signature' => $signature);

$post_data = http_build_query($post_data, '', '&');

$curl = curl_init($apiUrl); 
curl_setopt($curl, CURLOPT_SSL_VERIFYPEER, false);
curl_setopt($curl, CURLOPT_POST, true);
curl_setopt($curl, CURLOPT_URL, $apiUrl);
curl_setopt($curl, CURLOPT_HEADER, false); 
curl_setopt($curl, CURLOPT_RETURNTRANSFER, true);
curl_setopt($curl, CURLOPT_POSTFIELDS, $post_data);

$response = curl_exec($curl);  
curl_close($curl);

$xml = simplexml_load_string($response, 'SimpleXMLElement', LIBXML_NOCDATA);
echo "<pre>".print_r($xml, true)."</pre>";
 ?>